Copilot Edits (preview)
Use Copilot Edits to start an AI-powered code editing session where you can quickly iterate on code changes by using natural language. Based on your prompts, Copilot Edits proposes code changes across multiple files in your workspace. These edits are applied directly in the editor, so you can quickly review them in-place, with the full context of the surrounding code.
Copilot Edits is great for iterating on large changes across multiple files. It brings the conversational flow of Copilot Chat and fast feedback from Inline Chat together in one experience. Have an ongoing, multi-turn chat conversation on the side, while benefiting from inline code suggestions.
If you don't yet have a Copilot subscription, you can use Copilot for free by signing up for the Copilot Free plan and get a monthly limit of completions and chat interactions.
The following video shows how you can use Copilot Edits to modify a basic Express app and add a new page, implement a navigation bar, and modify the design to include a theme switcher.
The Copilot Edits feature is currently in preview. You can provide feedback and report problems in our issues.
Get started with Copilot Edits
You use the Copilot Edits view to start an edit session. Making code changes is often an iterative process and consists of multiple steps before you're satisfied with the result. An edit session consists of a sequence of requests (or turns) to Copilot Edits for making code edits. An edit session can go on for as long as you like, and you can send as many requests as you need to get the code to where you want it.
There are different ways to get started open the Copilot Edits view:
-
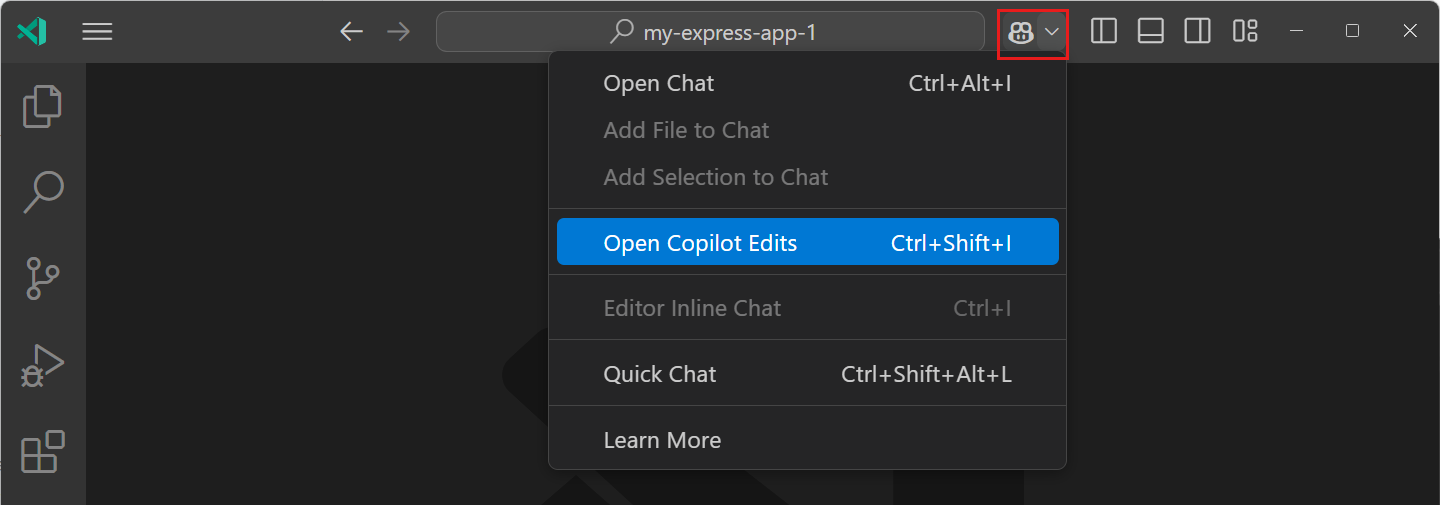
Use the ⇧⌘I (Windows Ctrl+Shift+I, Linux Ctrl+Shift+Alt+I) keyboard shortcut
-
Open the Copilot menu in the Command Center, and then select Open Copilot Edits
-
Use the View: Toggle Copilot Edits or Copilot Edits: Focus on Copilot Edits View command in the Command Palette (⇧⌘P (Windows, Linux Ctrl+Shift+P))
-
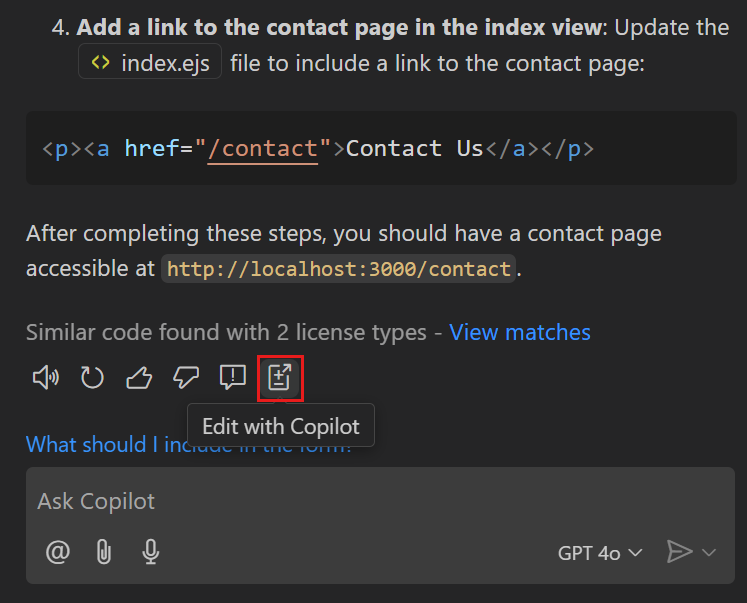
Move a previous chat conversation to Copilot Edits by selecting Edit with Copilot in the Chat view
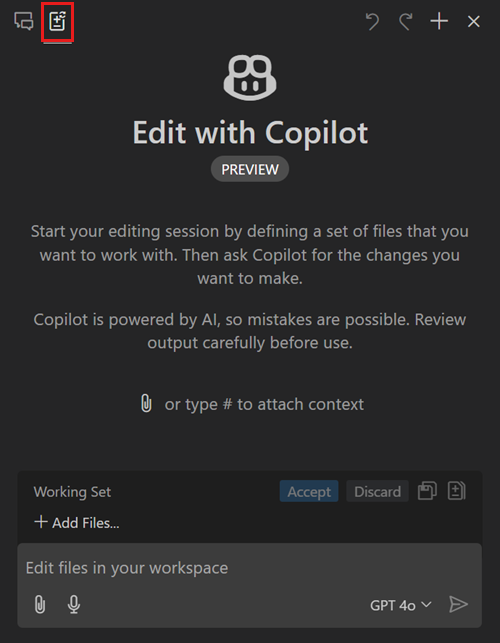
When you first open the Copilot Edits view or start a new edit session, a welcome message is presented.
Add files to the working set
The first step when you start an edit session is to add the relevant files you want to work with. These files are also known as the working set for your edit session. Copilot Edits does not make changes outside the working set, except when suggesting to create a new file.
The working set is currently limited to 10 files.
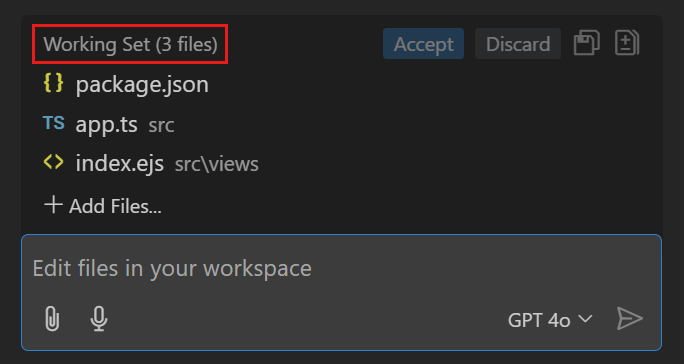
Copilot Edits automatically adds the active editor to the working set. If you have multiple editor groups, the active editor for each group is added to the working set. To add all open editors, select Add Files..., and then choose Open Editors from the Files Quick Pick.
You have many options to add files to the working set:
-
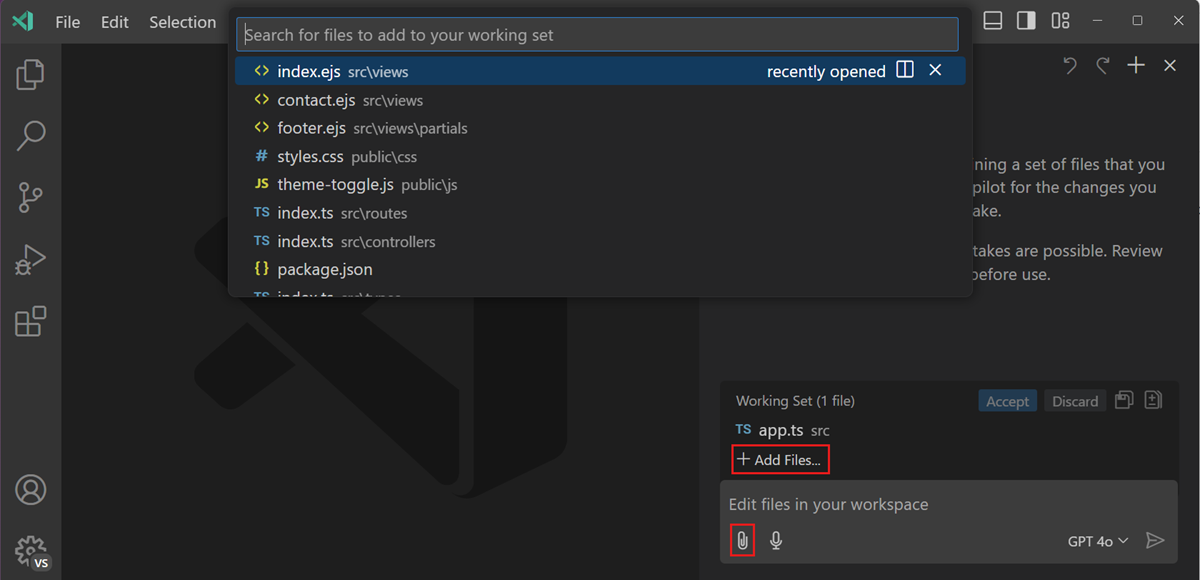
Select Add Files... or use the icon (⌘/ (Windows, Linux Ctrl+/)), and then select files in the Quick Pick.
TipTo quickly select multiple items from a Quick Pick, use the Up and Down keys to navigate the list, use the Right key to add the item as context, and then repeat this for other items.
-
Drag and drop editor tabs, or files or folders from the Explorer view, Search view, or editor breadcrumb onto the Copilot Edits view.
When you drop a folder onto the Copilot Edits view, all files in that folder are added to the working set.
-
Right-click on a file in the Explorer view or Search view and select Add File to Copilot Edits.
-
Select a suggested file. When you add one or more files to the working set, Copilot Edits proposes other relevant files based on the Git history.
If you don't want to see these suggestions, you can disable them with the github.copilot.chat.edits.suggestRelatedFilesFromGitHistory setting.
To further help Copilot Edits provide better code suggestions, you can also add relevant context to your prompt, such as #selection or #terminalSelection. Reference context by typing the # symbol, or by using the icon (⌘/ (Windows, Linux Ctrl+/)).
You can also add file or symbol references in your prompt by using # as an IntelliSense trigger for file or symbol suggestions. If Copilot decides to make changes to the files you mentioned in your prompt, they are added automatically to your working set.
Request code edits
After you've added the relevant files, enter a chat prompt using natural language about the specific edit you want to make. For example, "Add a contact page that shows email, telephone and postal address", or "convert all unit tests to vitest".
Be specific and precise about the changes you want Copilot Edits to make. If you have a larger task, decompose it in smaller tasks and iterate often to steer Copilot in the right direction.
In response to your prompt, Copilot Edits lists the files that are edited and provides a short description of the change. In addition, the suggested edits are applied to your code. As the edits stream in, Copilot Edits opens editor tabs for the affected files.
When Copilot Edits generates edits for your project, it visually indicates which files in the working set are edited. Select a file in the working set to open it and view the proposed edits in the editor.
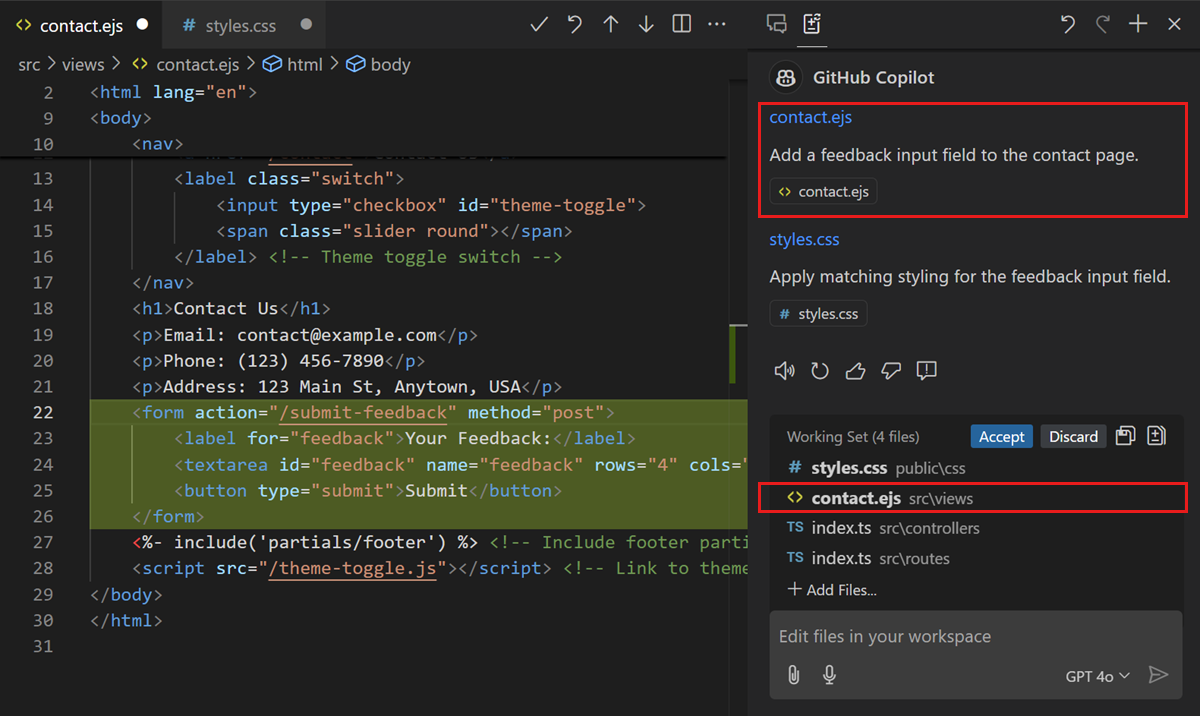
You can further iterate and send more requests in your edit session. If you're not entirely happy with the edits, you can ask follow-up question, such as "don't include the phone number", or "use jest instead of vitest". Or you can incrementally edit your code further. For example, when building a web app, use a series of prompts such as "add a navigation bar", "add a theme switcher", "store order items in JSON format in MongoDB".
Save generated edits
Copilot Edits shows the generated edits in-place in your code but doesn't automatically save the changes to disk (notice the dirty indicator in the editor tab). As part of reviewing the edits, you might depend on automated tasks that are triggered by a file change, such as a build or test task. You can save the individual files or select Save All (⌘S (Windows, Linux Ctrl+S)) in the working set to save the edits to disk.
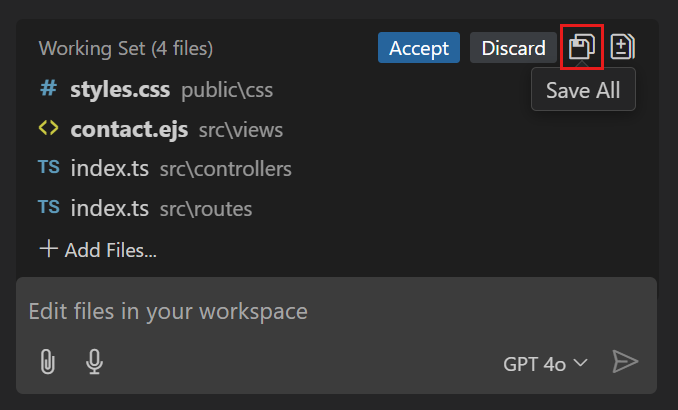
When you save a file that contains AI-generated changes, a confirmation dialog is shown. In the dialog, you can check the option to always save files without asking for confirmation. When checked, the Save All control is no longer shown. You can reset the confirmation by using the chat.editing.alwaysSaveWithGeneratedChanges setting.
Saving the files doesn't mean that you automatically accept the changes. After saving the files, you can still accept or discard the generated edits.
Accept or discard edits
Copilot Edits gives you a code review flow, where you can accept or discard each of the AI-generated edits. When you accept the AI-generated edits, the file changes are confirmed in the working set. If you discard the edits, the files are restored to their previously accepted state.
You can navigate between the different edits across your project by using the editor overlay controls. Use the Accept and Discard controls to accept or reject all changes for a given file.
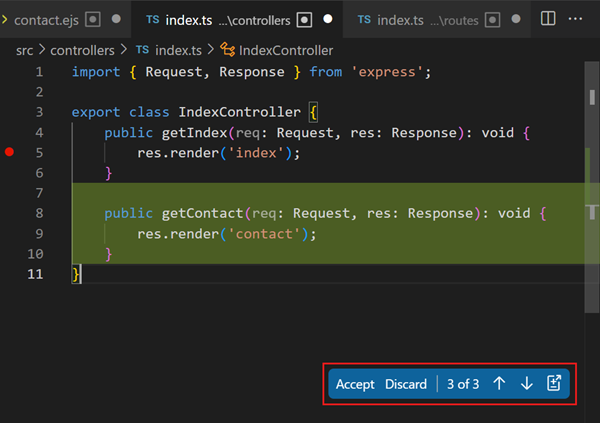
For more fine-grained control over which edit you want to accept or reject within a file, hover over the code edit and select the Undo control to reject a change.
Alternatively, you can also accept or discard the changes from the working set:
-
Select Accept (⌘Enter (Windows, Linux Ctrl+Enter)) or Discard (⌘Backspace (Windows, Linux Ctrl+Backspace)) in the working set title bar to accept or discard all edits in the working set
-
Select the Accept or Discard icon on an individual file in the working set to limit the action to that specific file
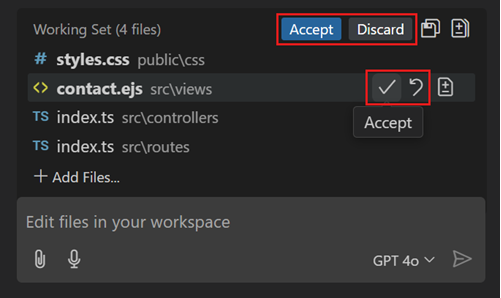
Undo edits
As you're sending requests to make edits to your code, you might want to roll back some of these changes, for example because you want to use another implementation strategy.
You can use the Undo Last Edit control in the Copilot Edits view title bar to revert the last edits and return to the state before sending the last request. After you perform an undo of the last edits, you can redo those edits again by using the Redo Last Edit control in the Copilot Edits view title bar.
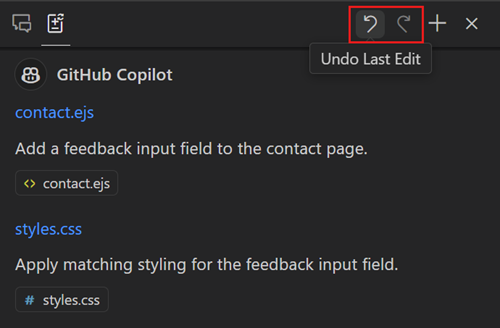
You can also use the Undo Edits (Delete) control when hovering over a request in the Copilot Edits view to revert all edits that were made from that request onwards.
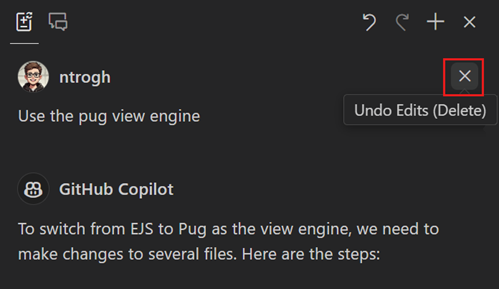
Sometimes Copilot starts walking down the wrong path when generating edits. Once that happens, it can be hard to convince it about another approach by adding to the conversation. In that case, use Undo Last Edit to the point where you agree with Copilot's responses. Then restart from there with a refined prompt.
Send a chat request to Copilot Edits
Copilot Chat is great for asking questions and exploring ideas and code suggestions about your project or technology topics in general. Once you're ready to apply the suggested code changes, you can transfer your chat session over to Copilot Edits. The advantage of doing this is that you can let Copilot Edits apply all the changes across your project, instead of having to apply each code block individually from the Chat view.
In the Chat view, select the Edit with Copilot button at the bottom of the chat conversation to apply the suggested code changes with Copilot Edits. If you have multiple chat requests in the chat session, you can select which requests you want to transfer to Copilot Edits.
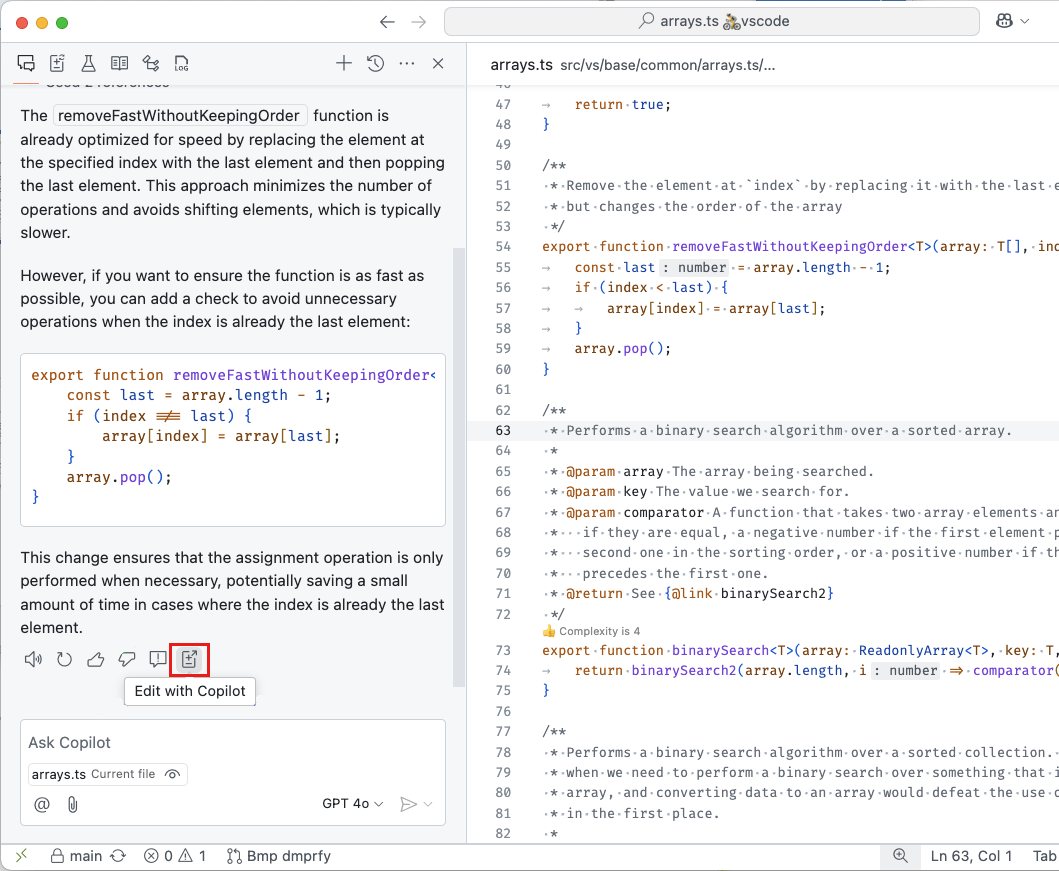
After moving a chat request to Copilot Edits, the chat request is removed from the chat conversation in the Chat view.
Settings
The following list contains the settings related to Copilot Edits. You can configure settings through the Setting editor (⌘, (Windows, Linux Ctrl+,)).
- chat.editing.confirmEditRequestRemoval - ask for confirmation before undoing an edit (default:
true) - chat.editing.confirmEditRequestRetry - ask for confirmation before performing a redo of the last edit (default:
true) - chat.editing.alwaysSaveWithGeneratedChanges - automatically save generated changes from Copilot Edits to disk (default:
false)
Keyboard shortcuts
The following list contains the default keyboard shortcuts related to Copilot Edits. You can modify any of the default keyboard shortcuts by using the Keyboard Shortcuts editor (⌘K ⌘S (Windows, Linux Ctrl+K Ctrl+S)).
- ⇧⌘I (Windows Ctrl+Shift+I, Linux Ctrl+Shift+Alt+I) - Open the Copilot Edits view
- ⌥⌘Enter (Windows, Linux Ctrl+Alt+Enter) - Send a prompt from the Chat view to Copilot Edits
- ⌘/ (Windows, Linux Ctrl+/) - Attach context to your prompt
- ⌘S (Windows, Linux Ctrl+S) - Save all edited files to disk
- ⌘Enter (Windows, Linux Ctrl+Enter) - Accept all edits
- ⌘Backspace (Windows, Linux Ctrl+Backspace) - Discard all edits
- ⇧⌥F5 (Windows, Linux Shift+Alt+F5) - Navigate to the previous edit within a file
- ⌥F5 (Windows, Linux Alt+F5) - Navigate to the next edit within a file
If you want to change a keyboard shortcut for an action that's specific to the Copilot Edits view, you need to include the following condition in the when clause: chatLocation == 'editing-session'.
Limitations
- Multiple simultaneous edit sessions are not supported yet.
- The use of
@workspace /newto scaffold a new project is not supported yet in an Edit session. For now, use Copilot Chat for the initial scaffolding. - Although
#codebaseis great at finding relevant context for your query, subsequent generated edits are of widely varying quality. Explicitly adding files to your working set creates better results. - Support for Jupyter notebooks, other custom text formats, and binary file formats is absent or untested.
- The working set is currently limited to 10 files.
- Copilot Edits is limited to 7 editing requests per 10 minutes.
Frequently asked questions
How is Copilot Edits different from Copilot Chat?
Both Copilot Chat and Copilot Edits use a conversational interface, where you can use natural language prompts to get AI-powered suggestions. There are several distinct differences between Copilot Edits and Copilot Chat.
Copilot Edits puts you in the context of code editing, where you start an edit session and use prompts for making changes to your codebase. Copilot Edits can generate and apply code changes directly across multiple files in your codebase. You can immediately preview the generated edits within the context of your code.
The Chat view gives you a more general-purpose chat interface for asking questions about your code or technology topics in general. Copilot can also provide code suggestions and generate code blocks as part of the chat conversation. You need to manually apply each code block to the different files in your project to evaluate their validity.
Inline Chat keeps you in the coding flow by providing a chat interface in the editor, where you can preview the generated code suggestions directly in the context of your code. The scope of Inline Chat is limited to the editor in which it's started, so it can only provide code suggestions for a single file. You can also use Inline Chat to ask general-purpose questions.
Copilot Edits also provides you a code review flow where you can easily review generated edits and decide to accept or discard them. Copilot Chat does not have this code review mechanism. In addition, you can undo past edits and roll back changes to a previous accepted state.
The following table shows a comparison of the capabilities of each experience.
| Capability | Copilot Edits | Chat view | Inline Chat | Quick Chat |
|---|---|---|---|---|
| Multi-file edits | ✅ | ✅* | ✅* | |
| Preview code edits | ✅ | ✅ | ||
| Code review flow | ✅ | |||
| Roll back changes | ✅ | |||
| Attach context | ✅ | ✅ | ✅ | ✅ |
| Use participants & commands | ✅ | ✅ | ||
| Generate shell commands | ✅ | ✅ | ||
| General-purpose chat | ✅ | ✅ | ✅ |
* code blocks are included in the chat conversation and need to be applied to the right file manually
Can I change the location of the Copilot Edits view?
You can drag and drop the Copilot Edits view into the Activity Bar to show it in the Primary Side Bar. You can also move it to the Secondary Side Bar. Learn more about custom layouts in VS Code.